TK-421
New member
Welcome to another How to Install by TK-421!
Today we will be covering the installation procedure for installing polyurethane bushings for your shift linkage.
This install will cover both the front and rear bushings.
So have you noticed lately that your shifter is feeling a bit sloppy? When you shift into gears does it feel like you stretching a rubber band?
If so then this is the modification your looking for to improve that shifter feel and response.
Poly bushings come from several different manufactures, popular ones include, Cobb Tuning, Kartboy, TiC, and Torque Solutions. Which ever company you choose to buy from is your choice, they all look the same, and pretty much all serve the same purpose.
Today I will be installing both front and rear bushings on a 2011 STi Sedan, though this procedure will be relatively the same for 2004 and up STi's.
OKAY! ready? lets go over the tools and equipment you'll need first before we dive into this project.
On a scale from 1 to 10 on difficulty, I would rank this project at about a 3 out of 10. It's not a very hard install, some people have been told that doing the rear bushing can be a real PITA, but its really not that big of a deal.
Okay, so assuming your a very DIY person when it comes to your car, and you have a decent set of hand tools available, your going to breeze right through this, because you dont need many tools at all.
Your going to need at the minimum:
1/2", 3/8" or 1/4" drive ratchets.
A 12 mm socket and 14mm socket (deep or shallow sockets both will work)
A 3 inch extension, just to keep from banging your knuckles up against the underside of the car
12mm and 14mm Wrenches
Optional Tools include:
3/8" Drive Air impact Wrench
1/4" Drive Air Ratchet
12mm and 14mm Ratcheting Wrenches
I do this sort of work for a living so I have more than just the average assortment of tools that a enthusiast would own. So I do use my specialty and power/air tools quite a bit. If you do not own air tools or power tools thats okay. Not everyone has the luxury of using these tools to get the job done.
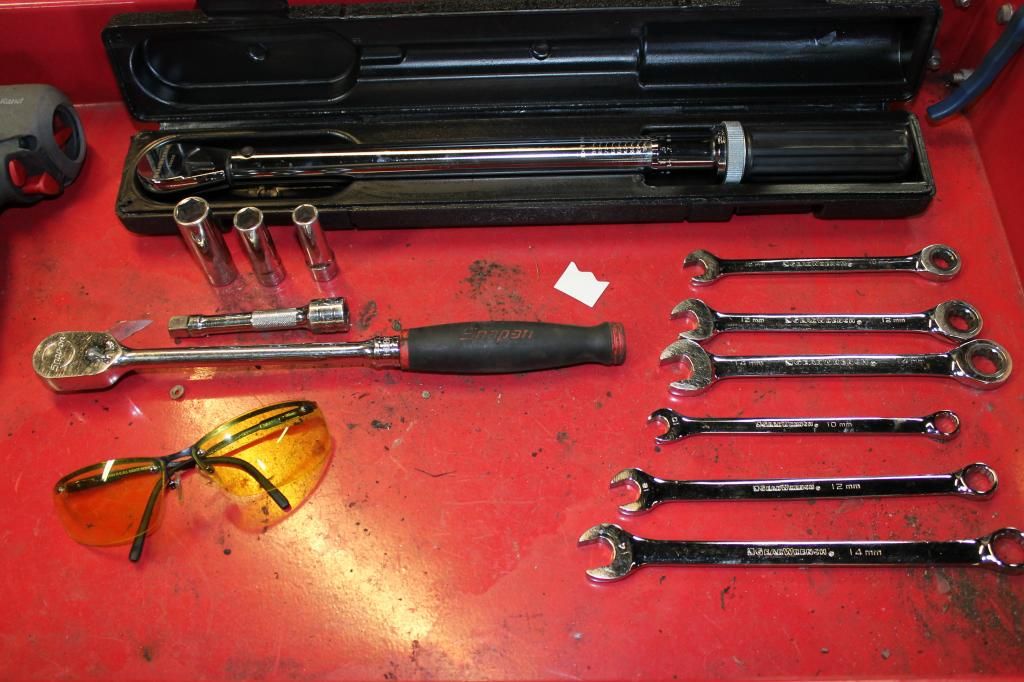
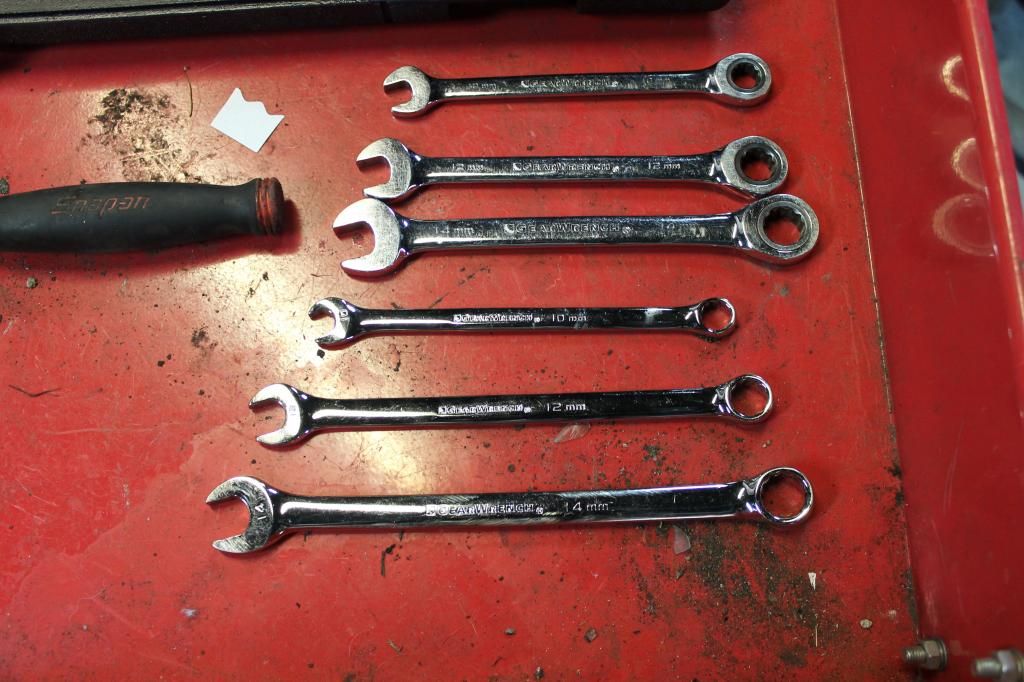
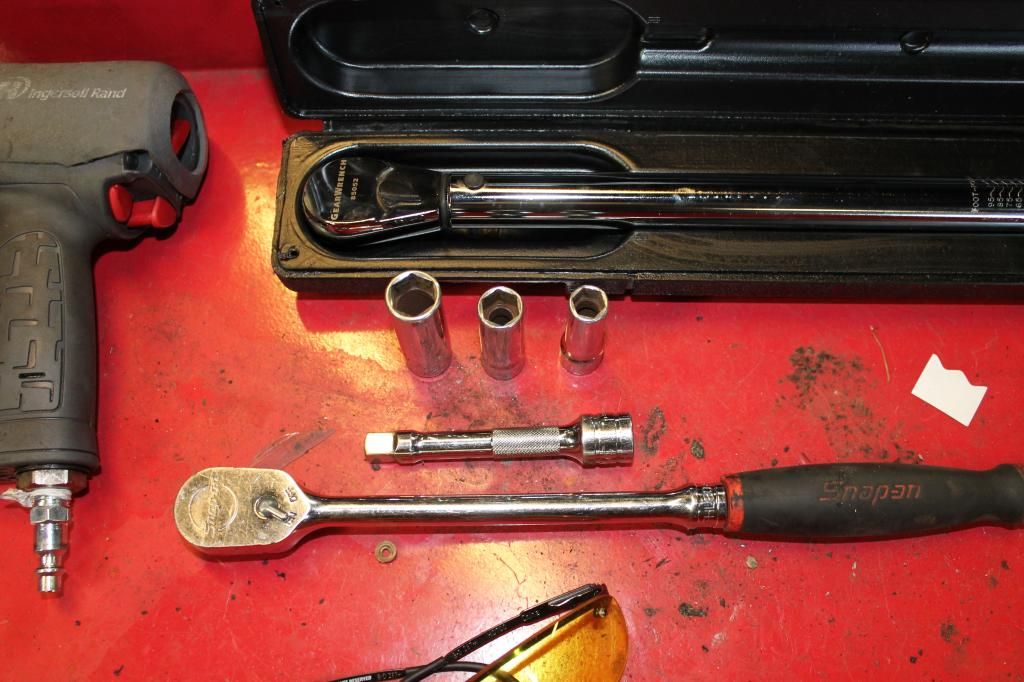
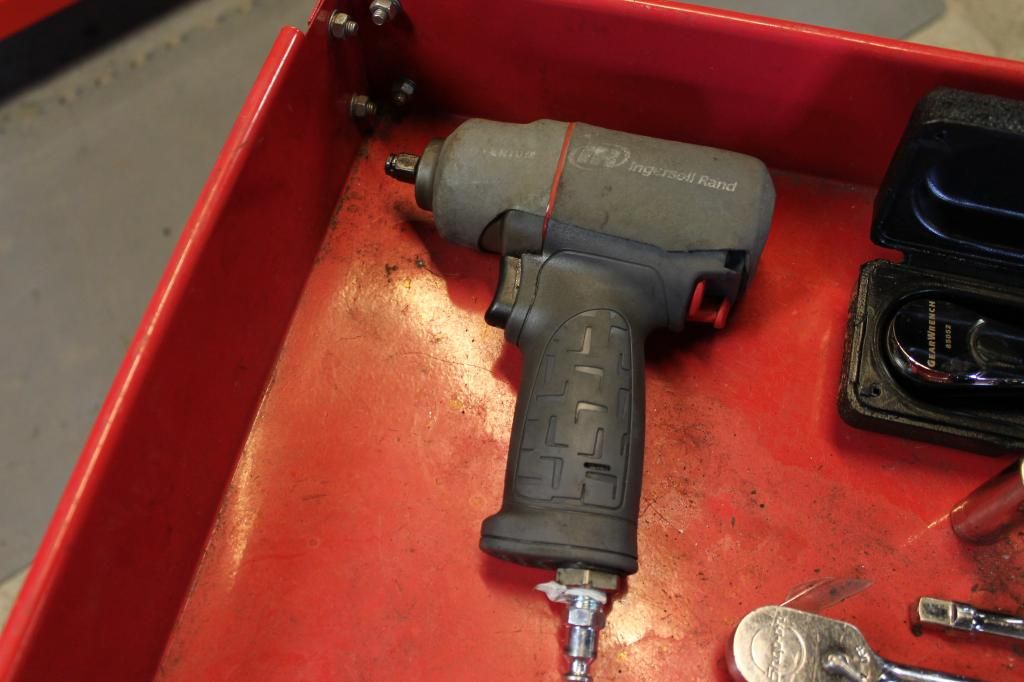
Alright we have covered the tools your going to need.
Lets go over the parts your going to install
The bushings I will be installing today will be from Torque Solutions
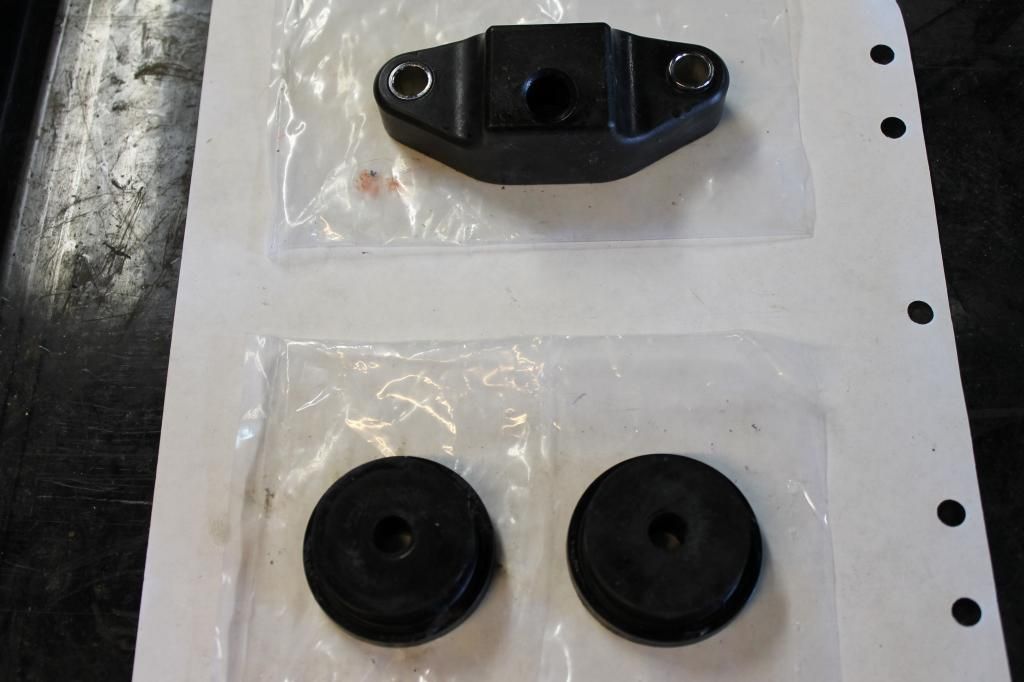
Right, so here we have the new poly bushings, the top one is your rear shifter bushing and the bottom two are your front shifter bushings
Now its time to jack up the car and get to work.
Use safety stands and safety glasses when working underneath your car. NEVER work under your car with the car supported by just the floor jack!!!!!!
And I always use safety glasses when working under the car, the last thing you want is a piece of something whether it be dirt, rust, metal, sand, whatever it is, falling into your eyes and causing damage.
Alright so you have your vehicle in the air and supported on jack stands, good job your well on your way!
Use either a creeper or a piece of cardboard and slide under your car right underneath the driver side or passenger side front door.
Your going to be removing the 4 bolts that hold your center heatshield on to the car.
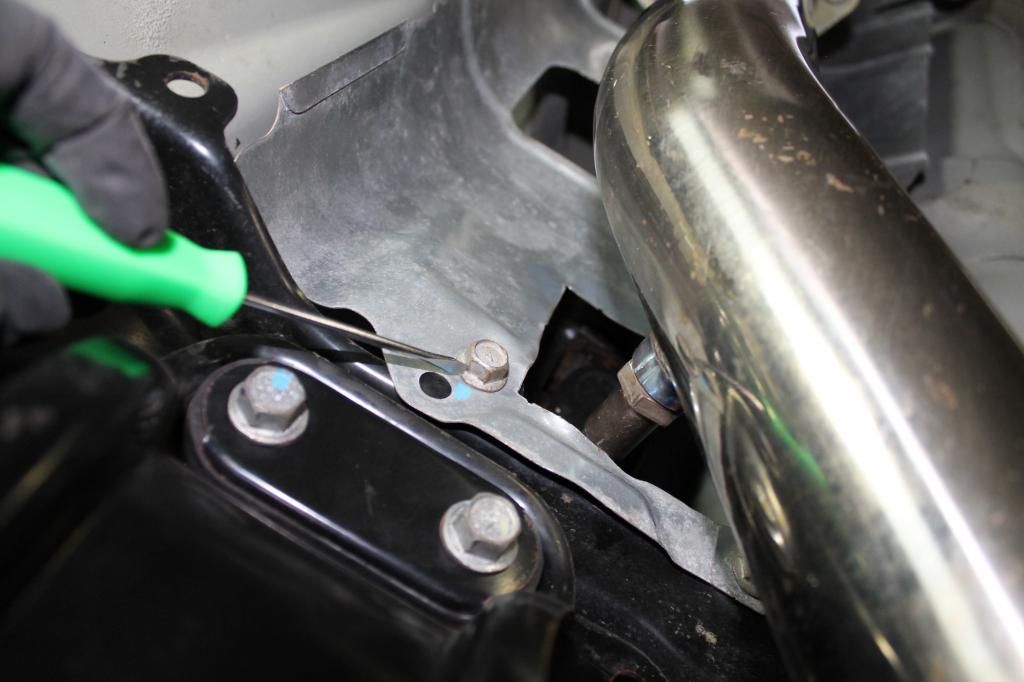
These are 12mm bolts, it can be a tight fit with the bolt on the passenger side, due to it being so close to the downpipe. So take your 12mm wrench and break that bolt loose so you can twist it out with your fingers. But if you have a 12mm ratcheting wrench that will be the best way to get that bolt out. The other three bolts can be removed with a standard 3/8" drive ratchet and socket.
Okay so you've taken out all the bolts that hold the heat shield on and its now loose.
Time to disconnect the oxygen sensor from the harness. Move up to the front and unplug the sensor, feed the wire back to the hole in the heat shield .
Now there is no way of getting the heat shield off without either A taking out the Oxygen Sensor or B removing the rear cross brace. We are going to leave the oxygen sensor in place and remove the cross brace, due to the fact that removing the cross brace will give us better access to the front bushing.
On to removing the cross brace, now when you unbolt this item the transmission will move slightly, do not be alarmed the transmission will not fall on you. There are 6 bolts that we will be removing to remove the cross brace from the car. All of them are 14mm two on the left side, two on the right side and two in the middle. The outer bolts will be short while the middle bolts will be long.
Make good use of your 14mm socket and ratchet or 14mm socket and Air Gun if you have one for use. There will be a rubber bushing underneath the two middle long bolts. Do not loose this.
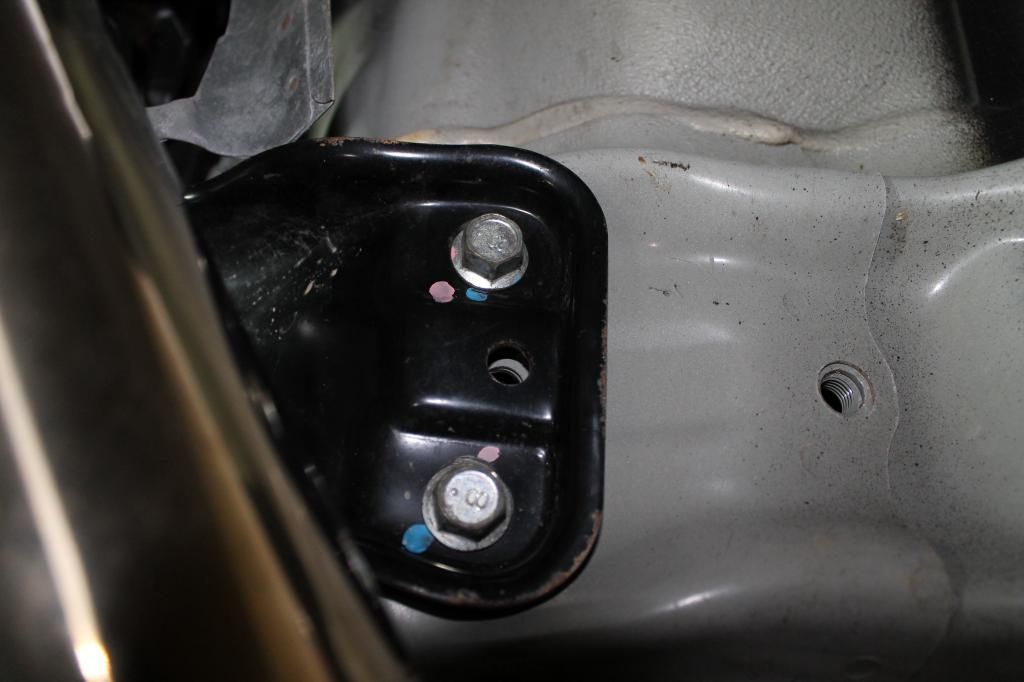
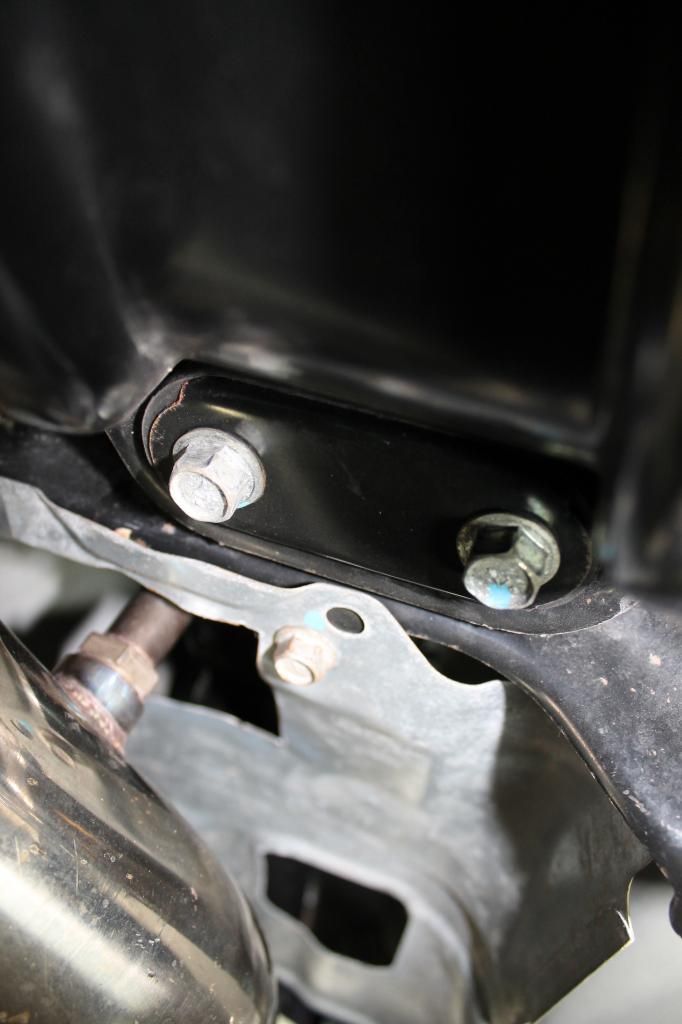
Alright now that you have removed all those 14mm bolts, the brace can be wiggled out the passenger side. Once the brace is removed the heat shield can be wiggled out and set aside as well.
Now we have a clear view of both the front and rear shifter bushings.
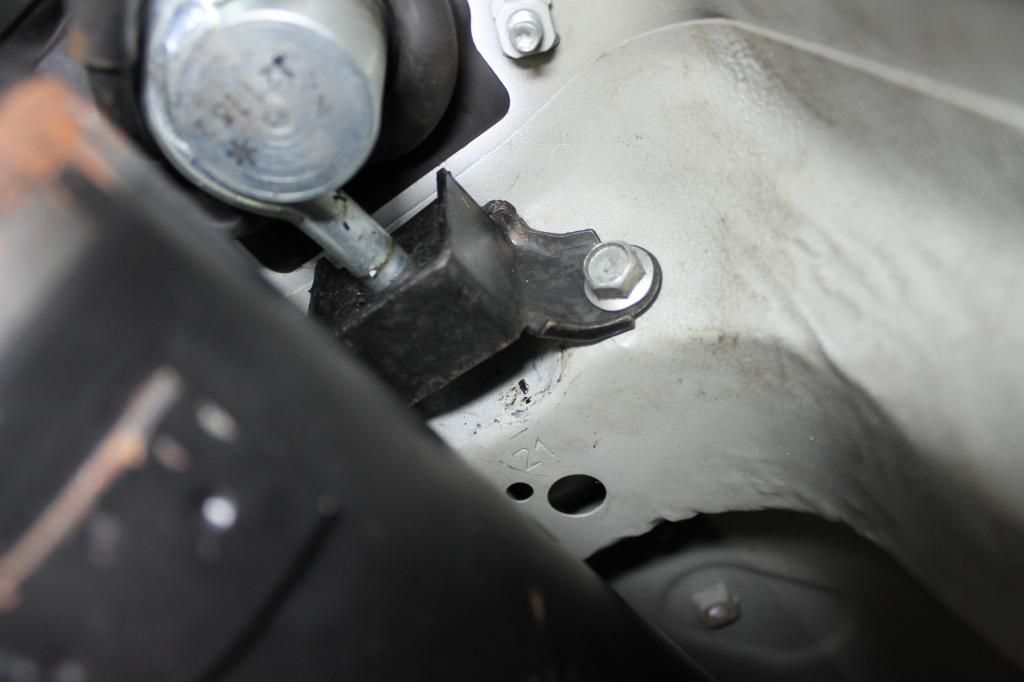
This is your Rear Bushing

This is your Front Bushing
Lets start with the rear bushing. Take your 12mm socket or wrench and remove the two bolts securing it to the car. Note that you will not be using these bolts with the new bushing as these bolts are too short.
Your new bushing should come with two new longer bolts to be used with the new bushing.
Dont worry about trying to wrangle that rear bushing out just yet, just take the two bolts out.
Now move up to the front bushing and remove the 14mm bolt that is pictured above. This one can be a little tight, and is really only accessible by using your 14mm wrench. Unless you have a 14mm crowsfoot to put on the end of your ratchet.
Once the bolt has been loosened out of the threads that secures it, grab the shift linkage and pull down towards you. once you have freed the linkage you can remove the bolt the rest of the way.
Now you can remove the bushings. The front bushing should press right out with your hands, and the rear bushing should just slide right off the end of the linkage.
Good your now half way finished with this task!
Take your old bushings over to where you have your new poly bushings at. I like to compare my parts to see if they match up when it comes to mounting points.
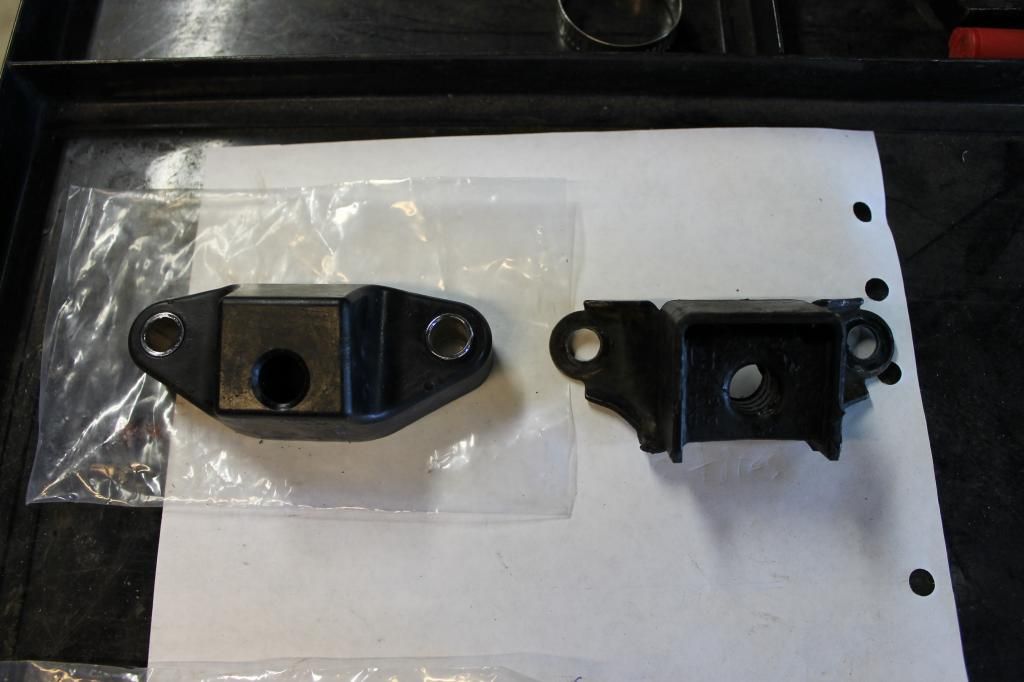
Rear Bushing Comparison
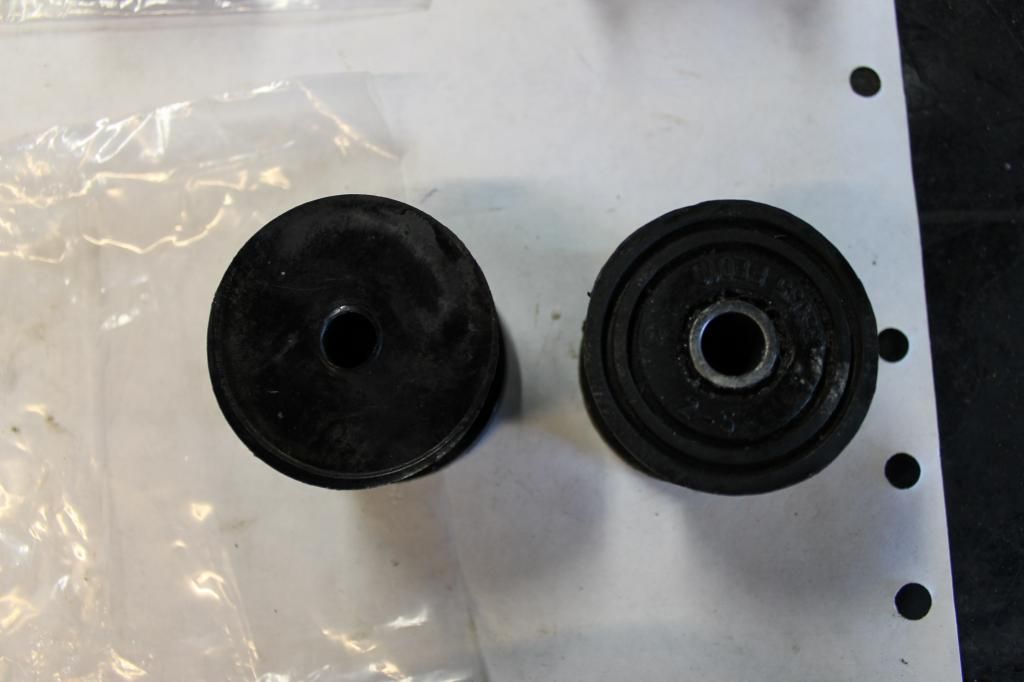
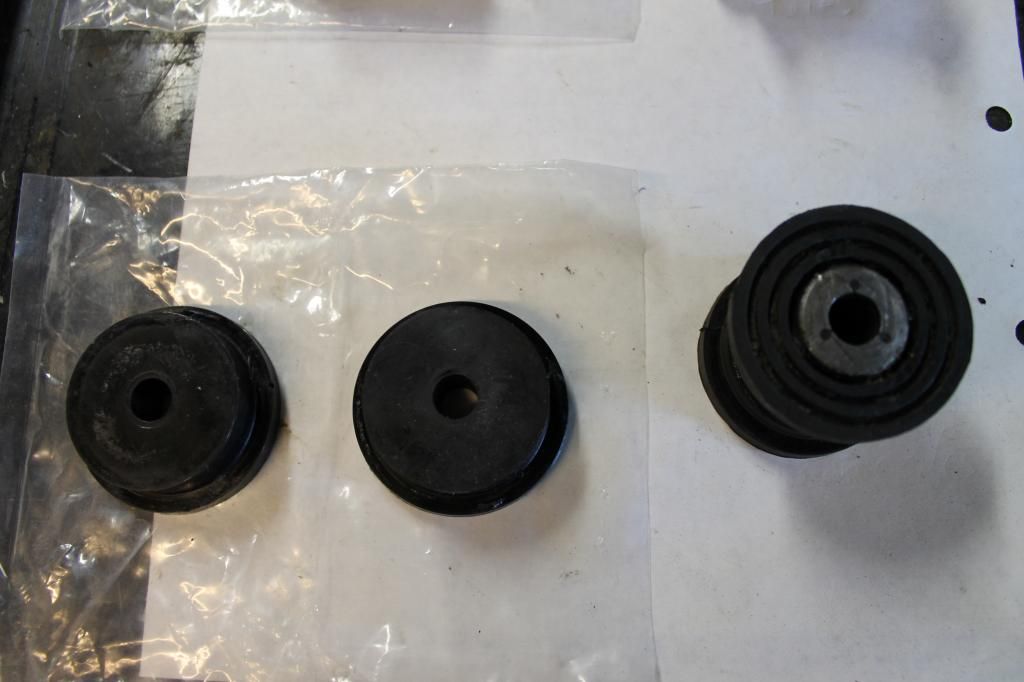
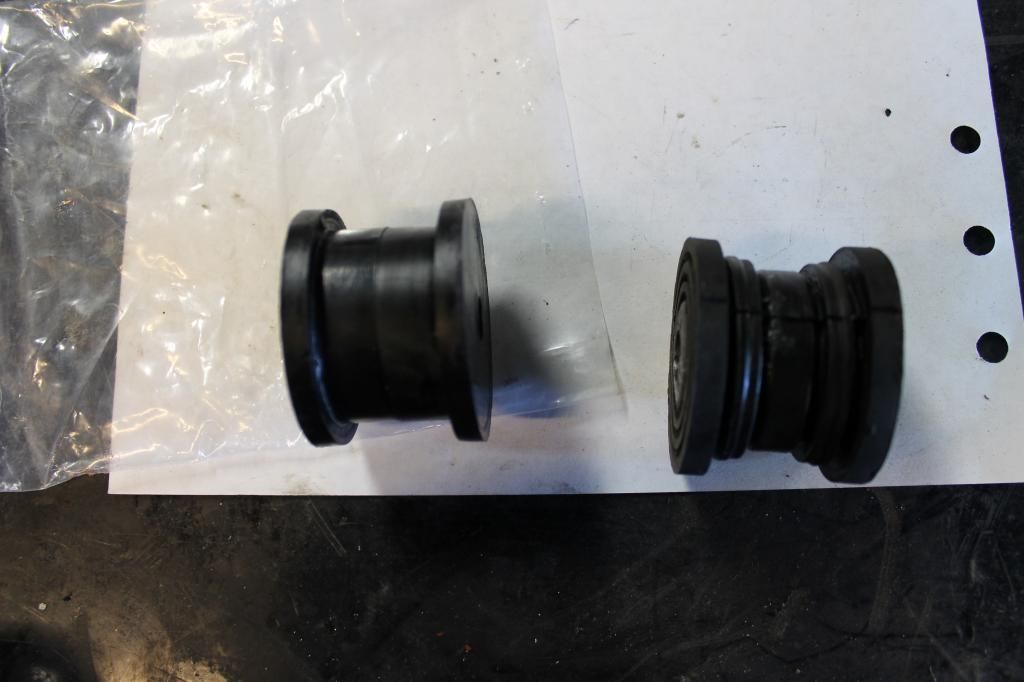
Front Bushing Comparison
Now I like to put a small amount of silicone paste on the bushings where the linkage will contact them. You do not have to do this step, its just a small extra step I myself take when installing any bushings in any car. If the car is older and the bushings were pretty much dry rotted and falling out, I recommend doing this step. If the vehicle is newer and still has some factory grease on the shifter linkage, you can forego this step if you choose.
Take your new bushings and get back under the car, slide the new rear bushing on first. It only mounts to the car one way, if the bolt holes do not line up, simply twist the bushing around until the bolt holes line up.
Start your new longer bolts by hand, just a couple of threads that way you have enough maneuverability to install the front bushings.
Take the two halves of your new front bushings and insert each half into the circle portion that you pushed the old bushing out of.
Now take your 14mm bolt you previously removed and dont forget the reverse lockout cable mounting bracket and slide the bolt though just enough till its flush with the other side of the bushing, do not push it all the way through.
Now slide the front bushing back up into place where it mounts to the transmission. Slide your 14mm bolt through, and start to thread it into place, you may have to wiggle the linkage to get the bolt to line up and start. ALWAYS start your bolts by hand, once you have a few threads turned in by hand, then you can put your wrench on there and tighten it down snug. Dont over tighten it, you dont need to he-man it on there, just snug it up and then give it a few turns past snug to fully tighten.
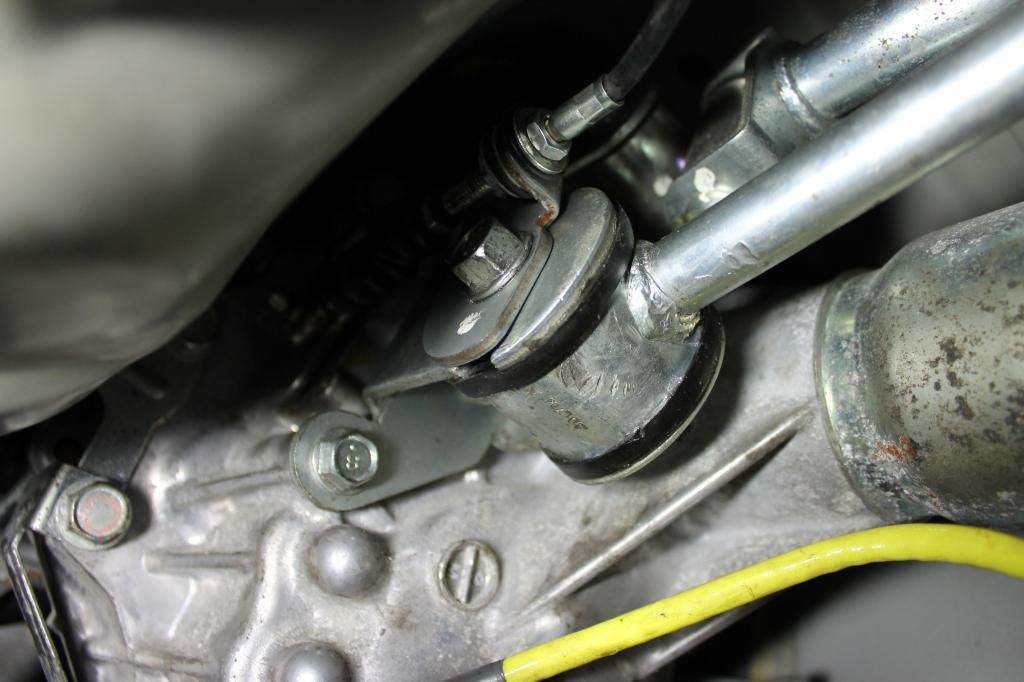
Now go to the back and tighten up those 12mm bolts securing the rear shifter bushing to the car.
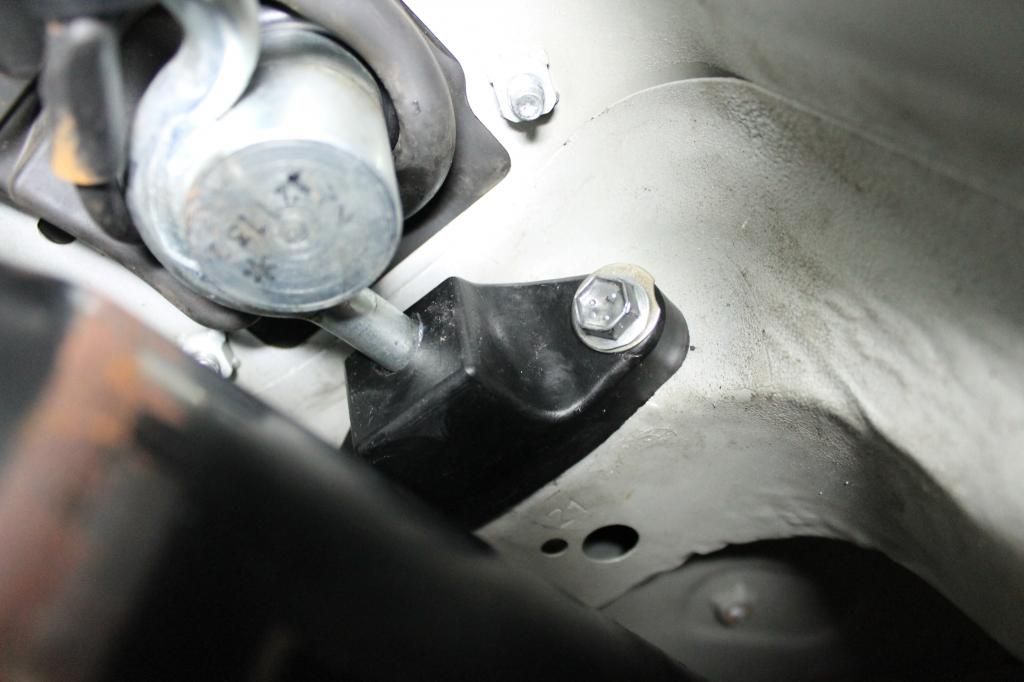
The rest of the steps are pretty much the reverse procedure to install.
Start with the cross brace, install the outer bolts first and then finish off with the two middle longer bolts, dont forget to install that rubber bushing back into place!
Use a floor jack to raise the transmission slightly so the longer bolts can be reinstalled.
Once you have the brace reinstalled and tightened up you can wrestle that heat shield back into place. It can be a PITA but keep at it and youll get it in there.
Reinstall the four 12mm bolts holding the heat shield into place.
Reconnect that Oxygen Sensor you unplugged, and your all ready to let the car back down on the ground and take it for a test drive.
Now your going to notice an increase in drivetrain noise while your in gear. Thats normal as the bushings are more stiff than stock and will transfer more vibration into the cabin.
But the up side is, your shifts will be more solid and have a better feel, if you thought the car had a notchy shift to it before, this will totally make you rethink what "notchy" is.
You most definitely will know when the car is in the selected gear and it will no longer feel like you are stretching a rubber band when you go to shift into the next gear.
In my opinion it is one of the best "first" mods anyone can do to their STi after purchase. These bushings can be used with both the factory shifter and a aftermarket short throw shifter.
Congrats!
You have just installed your new polyurethane shifter bushings, enjoy your new shifting feel.
And if anyone has any questions, feel free to ask.
As Always Happy Modding,
TK-421
Today we will be covering the installation procedure for installing polyurethane bushings for your shift linkage.
This install will cover both the front and rear bushings.
So have you noticed lately that your shifter is feeling a bit sloppy? When you shift into gears does it feel like you stretching a rubber band?
If so then this is the modification your looking for to improve that shifter feel and response.
Poly bushings come from several different manufactures, popular ones include, Cobb Tuning, Kartboy, TiC, and Torque Solutions. Which ever company you choose to buy from is your choice, they all look the same, and pretty much all serve the same purpose.
Today I will be installing both front and rear bushings on a 2011 STi Sedan, though this procedure will be relatively the same for 2004 and up STi's.
OKAY! ready? lets go over the tools and equipment you'll need first before we dive into this project.
On a scale from 1 to 10 on difficulty, I would rank this project at about a 3 out of 10. It's not a very hard install, some people have been told that doing the rear bushing can be a real PITA, but its really not that big of a deal.
Okay, so assuming your a very DIY person when it comes to your car, and you have a decent set of hand tools available, your going to breeze right through this, because you dont need many tools at all.
Your going to need at the minimum:
1/2", 3/8" or 1/4" drive ratchets.
A 12 mm socket and 14mm socket (deep or shallow sockets both will work)
A 3 inch extension, just to keep from banging your knuckles up against the underside of the car
12mm and 14mm Wrenches
Optional Tools include:
3/8" Drive Air impact Wrench
1/4" Drive Air Ratchet
12mm and 14mm Ratcheting Wrenches
I do this sort of work for a living so I have more than just the average assortment of tools that a enthusiast would own. So I do use my specialty and power/air tools quite a bit. If you do not own air tools or power tools thats okay. Not everyone has the luxury of using these tools to get the job done.


Alright we have covered the tools your going to need.
Lets go over the parts your going to install
The bushings I will be installing today will be from Torque Solutions

Right, so here we have the new poly bushings, the top one is your rear shifter bushing and the bottom two are your front shifter bushings
Now its time to jack up the car and get to work.
Use safety stands and safety glasses when working underneath your car. NEVER work under your car with the car supported by just the floor jack!!!!!!
And I always use safety glasses when working under the car, the last thing you want is a piece of something whether it be dirt, rust, metal, sand, whatever it is, falling into your eyes and causing damage.
Alright so you have your vehicle in the air and supported on jack stands, good job your well on your way!
Use either a creeper or a piece of cardboard and slide under your car right underneath the driver side or passenger side front door.
Your going to be removing the 4 bolts that hold your center heatshield on to the car.

These are 12mm bolts, it can be a tight fit with the bolt on the passenger side, due to it being so close to the downpipe. So take your 12mm wrench and break that bolt loose so you can twist it out with your fingers. But if you have a 12mm ratcheting wrench that will be the best way to get that bolt out. The other three bolts can be removed with a standard 3/8" drive ratchet and socket.
Okay so you've taken out all the bolts that hold the heat shield on and its now loose.
Time to disconnect the oxygen sensor from the harness. Move up to the front and unplug the sensor, feed the wire back to the hole in the heat shield .
Now there is no way of getting the heat shield off without either A taking out the Oxygen Sensor or B removing the rear cross brace. We are going to leave the oxygen sensor in place and remove the cross brace, due to the fact that removing the cross brace will give us better access to the front bushing.
On to removing the cross brace, now when you unbolt this item the transmission will move slightly, do not be alarmed the transmission will not fall on you. There are 6 bolts that we will be removing to remove the cross brace from the car. All of them are 14mm two on the left side, two on the right side and two in the middle. The outer bolts will be short while the middle bolts will be long.
Make good use of your 14mm socket and ratchet or 14mm socket and Air Gun if you have one for use. There will be a rubber bushing underneath the two middle long bolts. Do not loose this.


Alright now that you have removed all those 14mm bolts, the brace can be wiggled out the passenger side. Once the brace is removed the heat shield can be wiggled out and set aside as well.
Now we have a clear view of both the front and rear shifter bushings.

This is your Rear Bushing

This is your Front Bushing
Lets start with the rear bushing. Take your 12mm socket or wrench and remove the two bolts securing it to the car. Note that you will not be using these bolts with the new bushing as these bolts are too short.
Your new bushing should come with two new longer bolts to be used with the new bushing.
Dont worry about trying to wrangle that rear bushing out just yet, just take the two bolts out.
Now move up to the front bushing and remove the 14mm bolt that is pictured above. This one can be a little tight, and is really only accessible by using your 14mm wrench. Unless you have a 14mm crowsfoot to put on the end of your ratchet.
Once the bolt has been loosened out of the threads that secures it, grab the shift linkage and pull down towards you. once you have freed the linkage you can remove the bolt the rest of the way.
Now you can remove the bushings. The front bushing should press right out with your hands, and the rear bushing should just slide right off the end of the linkage.
Good your now half way finished with this task!
Take your old bushings over to where you have your new poly bushings at. I like to compare my parts to see if they match up when it comes to mounting points.

Rear Bushing Comparison


Front Bushing Comparison
Now I like to put a small amount of silicone paste on the bushings where the linkage will contact them. You do not have to do this step, its just a small extra step I myself take when installing any bushings in any car. If the car is older and the bushings were pretty much dry rotted and falling out, I recommend doing this step. If the vehicle is newer and still has some factory grease on the shifter linkage, you can forego this step if you choose.
Take your new bushings and get back under the car, slide the new rear bushing on first. It only mounts to the car one way, if the bolt holes do not line up, simply twist the bushing around until the bolt holes line up.
Start your new longer bolts by hand, just a couple of threads that way you have enough maneuverability to install the front bushings.
Take the two halves of your new front bushings and insert each half into the circle portion that you pushed the old bushing out of.
Now take your 14mm bolt you previously removed and dont forget the reverse lockout cable mounting bracket and slide the bolt though just enough till its flush with the other side of the bushing, do not push it all the way through.
Now slide the front bushing back up into place where it mounts to the transmission. Slide your 14mm bolt through, and start to thread it into place, you may have to wiggle the linkage to get the bolt to line up and start. ALWAYS start your bolts by hand, once you have a few threads turned in by hand, then you can put your wrench on there and tighten it down snug. Dont over tighten it, you dont need to he-man it on there, just snug it up and then give it a few turns past snug to fully tighten.

Now go to the back and tighten up those 12mm bolts securing the rear shifter bushing to the car.

The rest of the steps are pretty much the reverse procedure to install.
Start with the cross brace, install the outer bolts first and then finish off with the two middle longer bolts, dont forget to install that rubber bushing back into place!
Use a floor jack to raise the transmission slightly so the longer bolts can be reinstalled.
Once you have the brace reinstalled and tightened up you can wrestle that heat shield back into place. It can be a PITA but keep at it and youll get it in there.
Reinstall the four 12mm bolts holding the heat shield into place.
Reconnect that Oxygen Sensor you unplugged, and your all ready to let the car back down on the ground and take it for a test drive.
Now your going to notice an increase in drivetrain noise while your in gear. Thats normal as the bushings are more stiff than stock and will transfer more vibration into the cabin.
But the up side is, your shifts will be more solid and have a better feel, if you thought the car had a notchy shift to it before, this will totally make you rethink what "notchy" is.
You most definitely will know when the car is in the selected gear and it will no longer feel like you are stretching a rubber band when you go to shift into the next gear.
In my opinion it is one of the best "first" mods anyone can do to their STi after purchase. These bushings can be used with both the factory shifter and a aftermarket short throw shifter.
Congrats!
You have just installed your new polyurethane shifter bushings, enjoy your new shifting feel.
And if anyone has any questions, feel free to ask.
As Always Happy Modding,
TK-421


